B-Roll Photo Booth
David Avery
March 15, 2026
I needed way to produce repeatable photographs of print swatches and I am terrible at photography
The introduction pretty much covers the whole of the motivation here, I needed a way to create photos and videos for smaland-3dprint.se and other projects. I wanted easy repeatablity.
I worked in Fusion360 modelling the parts I already had, then moved onto the parts i needed to create. I worked through the basic functionality that i required and then through my list of would likes that created quality of life improvements
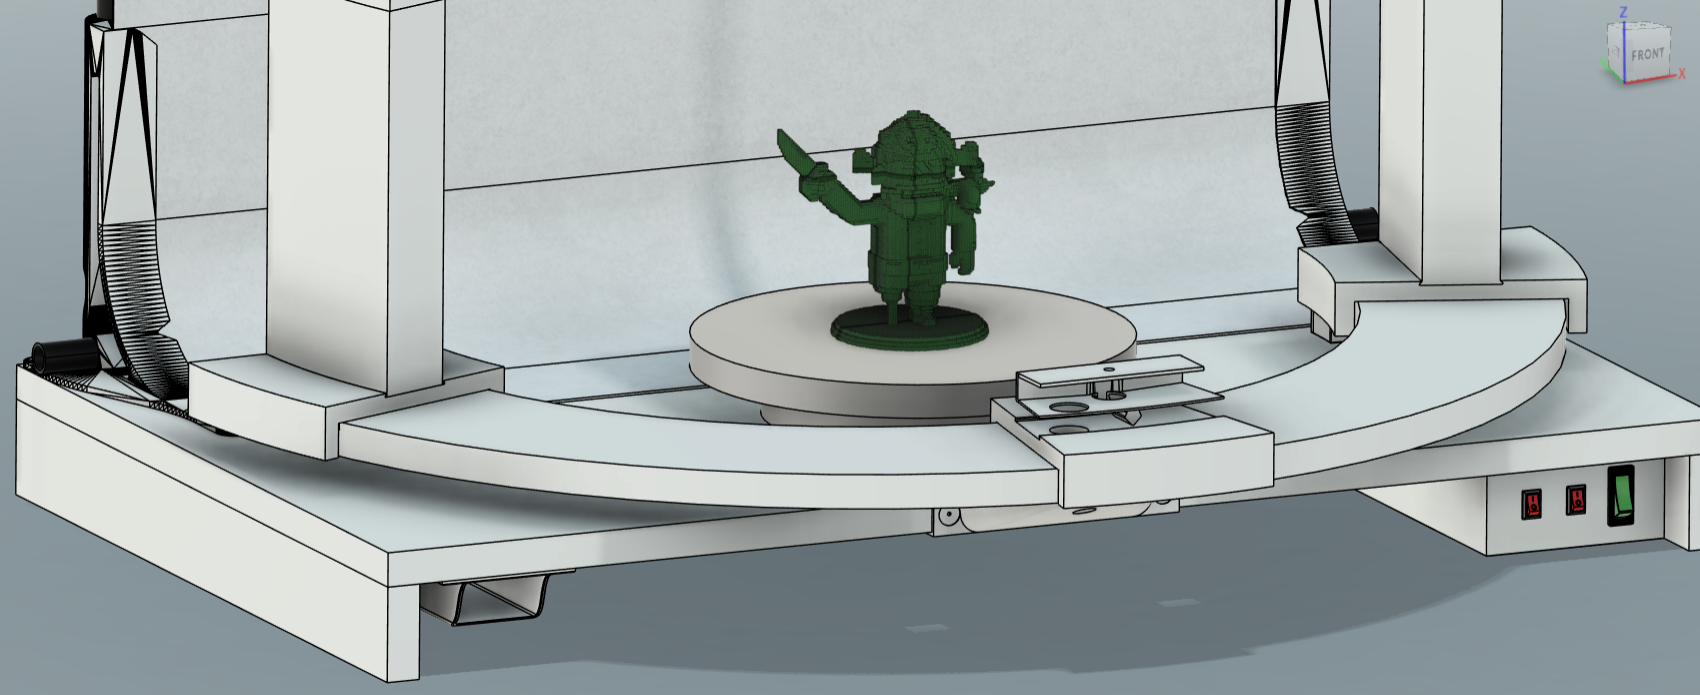
Base. I borrowed some white Melanine MDF from stock that wasnt getting used at the time, the size is basicly perfect, not too big, theres space underneath the main board to house the electronics and switches, and the remote control for the rotating platform.
Backdrop. I already had some parts like the metal bars that are in the backdrop support framing and intended to use them. When I was having a look around for inspiration I came accross a model on printables that mostly was exactly what i had in my head so using them was a nice shortcut. I will include the link to credit the author below. One thing i will say though the model when you directly downlad it has a balance issue, i glued and drilled mine into place to stop it falling backwards. its an easy fix though just by extending the base backwards as the placement of the bar makes it off the center of gravity and anything too large leverage starts to take effect.
Lighting. I chose some relatively inexpensive lights two for the side and one from above. I am pretty happy with them, they are entirely adjustable in their phyiscal positions and you can change the colours with the push of a button.
The towers the Lights sit on a are printed in a parts and as such are easy to modify and adjust to whatever is needed, my intention was i want the scene to be that i can drop in new parts, take photos and video and the positions and proportions are the same without set up time, so for me them being like this is perfect, then if i want to make changes i can change the height or the angle of the lights with a quick adjustment in CAD and Print.
Electronics. I wanted everything to be build once and remain in place ready to go whenever needed. so that had to include the lights which are battery or USB powered. So I found a silver box 5V power supply i had wired some switches to the various loads the (two tower lights and the overhead light) I can iscolated the AC220 coming in and each DC 5V. This was I can ensure that the lights are not disturbed and everything is going to work.
I should say that working with AC is dangerous so if you are thinking about copy anything remeber to ensure everything is iscolated safely and if you are still unsure ask a proffessional. I was stupid doing this and briefly managed to electrocute myself in my impatience when i forgot to unplug my box after testing!
Rotating Platform. I went for a ready made solutio here as it was cheap around €20 with a remote control ( i made a nice cubby hole for it to stay in under the base ofc) its capable of being charged, rand of a 5v supply, and takes a 18650 battery. I did measure the top and made a cover for it to accept my print swatchs so they are perfectly in the center of the plaform each time.
MDF Midstructure. With the idea of a simple locking rig in mind i decided to create a semi circle wooden frame where everything naturally points to the origin, where the photo subject will be. for this i used a hand router and a compass jig on the same wooden MFD melamine as the base. A couple passes and it was good enough, I painted the raw MDF sides white so they werent obvious in the otherwise mostly white project. I designed and printed some risers and a support to make some height to match the height of the rotating platform and create a space that could be used to pass wires under to keep the appearance clean.
Light and Camera towers. The towers have a modular interlocking approach. there is the base, the vertical riser, the top that provides the angle and postion for the light or camera, and the locking push fits.
The base is the same semi circle shape of the wooden midstructure. Slightly wider and over hanging on the outside and inside to provide a loose lock.
Two parts attach to the base one below, one above; a small hidden push fitting under and the vertical tower part above.
The push fitting goes in from under the base up into the tower. The tower slides into a dovetail joint, it is a friction fit, there is the possibility (depending on your print tolerances and face offset) for it too wiggle. in practice mine was strong on its own and didnt move but i wanted peace of mind. So i create the push fitting that also fits into the channel created for the USB charging cable. it goes through the base into the tower locking it in place. Additionally theres a cut-away channel on the base that allows the wire to escape without interferring with anything with the bases stability also.
The tower above the base, this is simply just the riser section, it has the mentinoed channel to allow a cable to pass up neatly hidden from sight. At the tope it has another dovetale joint built in this one at 90 degrees to the base. this is what the top section slides into
The top section here you have the locking mechanism for the camera, my camera choices had a simple enough deisgn that i could create just a channel and they self lock into place in the orientation and then they have a nut that stop and wiggling in the channel recess. you can change the angle in CAD easily and if you know your projection throw you can also create a model of the path of the light from the source like i did to ensure the light will be hitting your subject correctly. If you does this and its not perfect you can shorten or lengthen the riser section and change you lights angle or postion.
Push Fitting 2. This fitting is more important than the base one. The circular fit of the bases dovetail largely makes it self locking but the straight path and the forces of the light being in and angled postion mean that the topsection needs to be constrained. The push fitting solves this. its easy to put in and take out whilsts still providing all the strength needed for the role. and as its a tube it also allows the cable to pass by providing charge to the lights.
The towers provide all the real flexibility here. so you can position your work. i also have a version that has bolt holes on the base section for screwing down to an addtional printed support latch, this was largely due to me wanting to positon my camera very close to the swatches at times and that meant it was past the center of gravity and needed more support and the easy way to create that was a part that could take a hold to the underside of the midstructure.
I had a lot of things on hand like pipes, mdf wood, power supply etc which kept the cost down for me but the build is still probably less than €100 if you needed to go out and get everything.
2x Lights €20
1x Overhead Light €15
3x USB.C Cables $6
1x Rotating Platform €20
1 (pack of 5) Camera Bolts with D handle €3
1kg PLA Filament €15
Parts I had on hand (estimated prices):
LED Lit Mains power switch €2
DC switches €2
metal tubes €20
wire for circuits €10
screws €5
angle brackets (used in the base) €5
Paint €5
big piece of paper €5
glue €5
MDF €20
ACDC 5V power supply €5
Tools are another cost but if you can borrow or you already have them then its not included for that reason
Newest
Glove Box Port Holes - Working towards an affordable Glove Box. Part 1
Designing a Cost-effective Hall Effect Endstop in a small formfactor for 3D Printers Using AS5600 Sensor and Operational Amplifiers